Nintendo Labo interview part 2 – nose-picking prototype, decision to use cardboard, much more
Earlier in the month, an interview was published with Nintendo Labo director Tsubasa Sakaguchi, Switch director / Nintendo Labo producer Kouichi Kawamoto, and Nintendo Labo hardware lead Mr. Ogasawara. The developers had plenty to say about the new initiative for Switch during that discussion.
Today, the second portion was published online. The three developers had even more interesting things to share, including prototypes, why cardboard is used, and more.
You can read the next part of the interview below.
Prototype party
Now I’d like to dig a bit deeper into the Nintendo Labo development process. I heard that Sakaguchi-san and Kawamoto-san weren’t on the same team when the development process began, but that your teams were later merged. Can you talk a little about how you all came to work on Nintendo Labo?
Mr. Kawamoto: Sakaguchi-san was actually already prototyping before we started working together.
Mr. Sakaguchi: That’s right. At the beginning, I was working on it by myself. At some point four other people joined me and we decided to do something with our ideas.
And you wanted that “something” to be built around the Joy-Con controllers?
Mr. Sakaguchi: All we had been tasked with at the time was to do something with Nintendo Switch.
So you wanted to do “something,” but didn’t know what it would be? Sounds like a very uncertain start!
Mr. Sakaguchi: One of the ideas from our first brainstorming sessions was to make scissors using two Joy-Con. We figured they could move like this—you know, like scissors. We mentioned this earlier when we were talking about physical feedback, too, but it was the scissors idea that made us realize that constricting the movement of the Joy-Con, so they could only move in particular ways, improved the data we got from them. We could then write a program assuming that the Joy-Con could only move in these ways, which really simplified the process. The gyro sensors hadn’t been used this way before. There were a lot of ideas from these early sessions, but I was mostly focused on trying to make new attachments for the hardware.
What did people think about that?
Mr. Sakaguchi: Most people, including myself, thought it was a unique idea that would never get off the ground.
Mr. Kawamoto: I heard you were prototyping attachments with a 3D printer…
Mr. Sakaguchi: I was! But it turned out that making attachments out of plastic would be too costly, so at a certain point I had to set that idea aside.
Just to be clear, when you say “attachments,” you’re referring to hardware accessories for the Nintendo Switch system, right? That was your focus at the time?
Mr. Sakaguchi: Correct. Once we joined up with Kawamoto-san’s group we agreed that everyone would bring in their ideas and we’d start prototyping games that worked with them.
Mr. Kawamoto: The whole group was focused on making something unique with the Joy-Con, and coming up with ideas for intuitive games. We called our efforts “prototype parties.”
So you started out just wanting to gather as many ideas as you could?
Mr. Kawamoto: Pretty much. We agreed to ignore concerns about the cost and just solicited ideas that were interesting and intuitive. We didn’t provide any more detailed direction than that. Even though I was the one soliciting ideas, I have to admit that it must have been hard for the team to work with such a vague task. (Laughs.)
Mr. Sakaguchi: Yeah, we didn’t want to worry about being realistic at that point, we just wanted ideas. I decided to explore the idea for attachments again. There was just one thing that I kept thinking about … The right Joy-Con has an IR Motion Camera in it, but the camera was a little hard to use in a normal game.
How so?
Mr. Sakaguchi: It’s a little hard to explain. The camera is plenty powerful, but it’s hard to control. Consider the gyro sensor: if we want to make a game where a character transforms into a different shape when the Joy-Con is tilted, that’s easy enough to implement. But the IR Motion Camera isn’t as simple – and yet we knew that if we didn’t use the camera in addition to the controller differential controls, we wouldn’t be fully utilizing the Nintendo Switch hardware, and we wouldn’t be creating something intuitive.
What was the hardest part about working with the IR Motion Camera?
Mr. Sakaguchi: Well, it’s a camera, so the data you get from it isn’t stable.
What does that mean?
Mr. Kawamoto: This gets a little technical, but imagine spinning a gyro sensor through the air. In that case the data received is also difficult to parse.
Mr. Kawamoto: Remember when we talked about how we can’t know how the consumer will hold or move the Joy-Con, which is why constricting the movement of the Joy-Con makes it easier to get reliable data from the sensors? It’s the same issue with the IR Motion Camera. Moving it through the air results in unreliable data. We don’t know how the consumer will move, either. They could step out of the camera’s field of view, or they could stand too far away.
Mr. Sakaguchi: Eventually we realized that we could get the performance we wanted if we enclosed the camera in a box. If the position is fixed then the camera will know where to look for a reflective marker sticker and being enclosed means it won’t erroneously pick up other light sources.
Mr. Kawamoto: We realized pretty early on that we’d have to put it in a box!
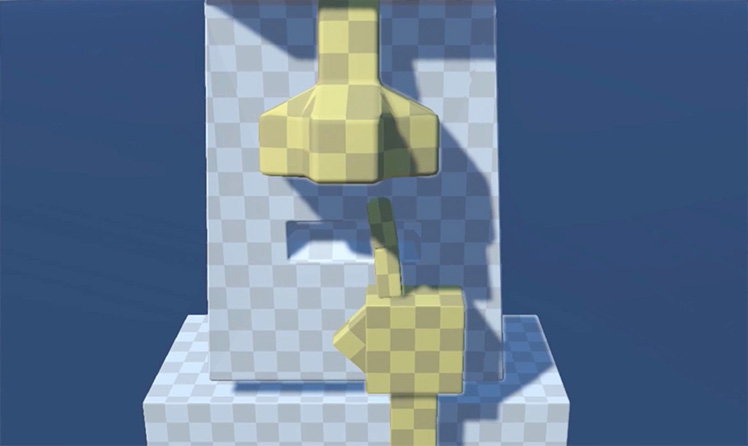
Mr. Sakaguchi: Here is the first project we made with that idea.
What the … nose picking?!
Mr. Ogasawara: We built a small enclosure around the Joy-Con’s IR motion camera. This allowed us to reliably read the motion of objects inside the enclosure. This is the first prototype we made to test the concept.
I don’t even know what to say. That’s ridiculous. (Laughs.)
Mr. Sakaguchi: It might look ridiculous at first, but we were testing an important idea. You see, we wanted to start with the smallest enclosure we could think of…
You mean… A nostril?
Mr. Sakaguchi: In this case, the IR Motion Camera inside the box registers movement and translates it to the finger on the screen. This was just a demo, but I remember thinking that if it worked, it would help us pin down whether the box trick would be effective or not.
One funny thing that happened during a test play session: a team member playing with it checked his finger afterward to see if anything had stuck to it. I remember thinking we were onto something there – with the technology working together seamlessly we’d achieved a real sense of immersion.
Mr. Kawamoto: Of course there was nothing to get stuck on his finger! (Laughs.)
Mr. Sakaguchi: When we finished our tests with this prototype, we wanted to try making a really large box next. We had ten people from the prototype team working on it.
What did you make the big box out of?
Mr. Sakaguchi: For the nose-picking game we used a 3D printer, but even when the printing process goes smoothly it still takes a whole day to produce one prototype.
Since our last project was about discovering how small we could make something, we wanted to see what the maximum size we could work with would be. We decided to go to the packaging material storage room and look for materials. We came back with a bunch of cardboard and used it to make this tank thing.
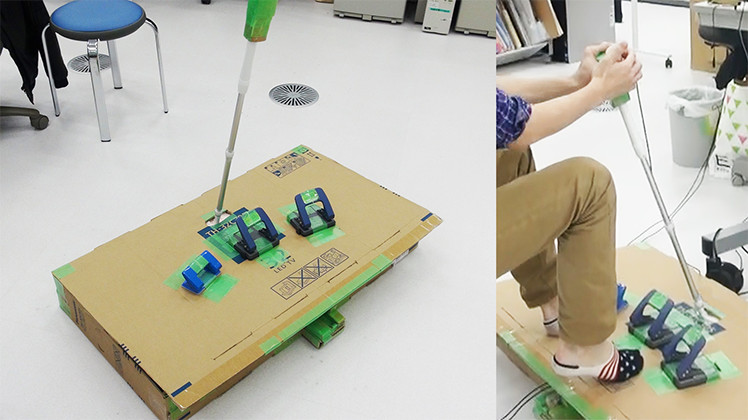
So this is where cardboard makes its appearance! What’s the broom-like thing on the top?
Mr. Sakaguchi: It’s a floor sweeper. The foot pedals are hole punchers.
How were the sensors used in this prototype?
Mr. Sakaguchi: There is a Joy-Con controller inserted in the bottom, and there are reflective balls suspended beneath the pedals that move up and down. The IR Motion Camera just reads the motion of the balls.
Mr. Kawamoto: The tank project showed us how much fun the mechanisms behind the projects themselves can be.
Why we decided to use cardboard
So you didn’t set out to make anything out of cardboard from the get-go? Ease of assembly was the priority for materials, and that’s what led the team to cardboard – do I have that right?
Mr. Kawamoto: That’s right. A typical 3D printer can produce an object from schematics quickly, but with the pace of our work it just wasn’t fast enough. We were making things, adjusting them, and testing them very rapidly. The 3D printer just couldn’t keep up.
Mr. Sakaguchi: That’s true. But the cardboard tank did break easily, because you had to apply your body weight to the top of it. So at the time I was still thinking that the final product would need to be made out of plastic. The tank also had the right Joy-Con stuck in place, so we weren’t making good use of the gyro sensor, which felt like a missed opportunity. That’s when we got the idea to lift the box off the floor and put it on our backs. This allowed us to utilize the gyro sensors and solve the body-weight issue at the same time. We tried it out, and came up with this robot prototype.
Mr. Ogasawara: We called it a “Carry-Con.”
Mr. Kawamoto: And when they showed me this robot prototype I thought they’d lost their minds (laughs). I mean, just look at the thing.
(Laughs.)
Mr. Kawamoto: Not only that, but I don’t think I’d ever seen a game console controller that makes use of a player’s hands and feet. The whole idea was crazy, in a good way (laughs). I was impressed, though, and I wanted to turn this into a real product. There were a lot of barriers to making it a hardware attachment, so I wasn’t sure how to proceed.
Mr. Sakaguchi: We knew we’d come up with something interesting, but we weren’t sure if it would sell. We’d come up to a hurdle, and I remember there were two specific things that got us over it. The first was Kawamoto-san’s idea that we incorporate the “making” process into the final product. The second was, well, we came up with a really boring prototype…
What was it?
Mr. Sakaguchi: This.
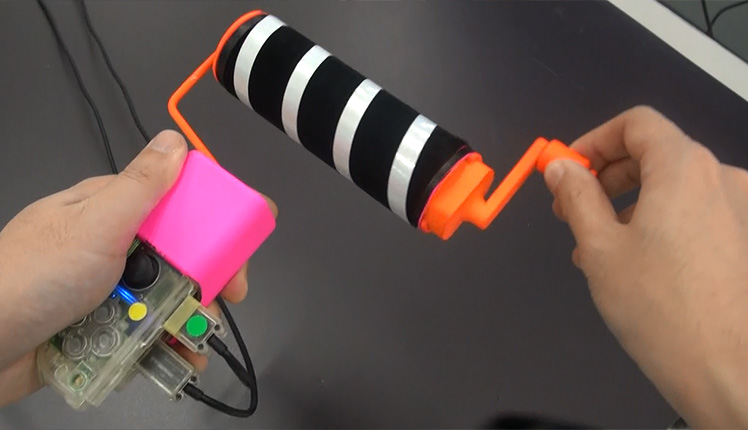
Mr. Sakaguchi: We made this music box, and as things turned out, it wasn’t fun at all. It basically worked the way those spinning barbershop poles work—they have diagonal stripes and the whole object rotates. The sign makes the rotation appear as if there is vertical motion, and we thought it might be neat to use a camera to capture that motion. Then we could calculate the speed and change the tempo of the music accordingly. The way it worked was so cool that we got really excited about it…
But then I thought about it from the player’s perspective, and I couldn’t imagine what they would do with it. It was an attachment for the Joy-Con that was basically a mystery for the player because there was no visibility into how it worked. So for the player it was an experience of a little spinning thing that made noise. I was like, “Who would enjoy playing with something like that?” (Laughs.)
Mr. Kawamoto: In the end, the prototype just wasn’t any fun.
Mr. Sakaguchi: The interesting part about the music box was that we could see how it worked, and the process of thinking through the concept itself was fun—and I realized that those are the very things the customer wouldn’t be able to experience. So we figured out exactly what we had to avoid, and that was huge. If we were going to make this into a product, we had to provide the whole experience to the customer. That’s when we realized that using cardboard and having the customer build the projects themselves was the right direction to go in. It took a potential weakness in the project and turned it into a strength.
So you decided on the material and the Make part of Nintendo Labo all at once?
Mr. Sakaguchi: That’s right. We realized that if we used cardboard, the user could build the project themselves, they could fix it themselves, they could make alterations to it themselves… and so on. It brought a lot of freedom into the Make process. Even better, the consumer could experience the joy of discovery. These ideas eventually led us to create the Toy-Con Garage mode.
As you can see, the Nintendo Labo logo is designed to look like a box with the lower right corner left open. We designed it like this to show that the box isn’t closed, that you can open these Toy-Con projects up and understand how they work. We wanted it to show that the kits include detailed instructions, but that there are tons of possibilities beyond them.